10.3Shop Domain
Claim the free ShopGoti address for your shop, connect your own domain with a DNS record, verify it, and make it the main address.
- Menu:
- Manage Shop
- Who:
- Owner · Manager
- Package:
- All packages
- Updated:
- 2026-10-15
Overview
Every shop gets a free address of the form yourname.shopgoti.com. On this page you can choose that name, and if your package includes a custom domain (Starter and above), you can connect a domain you own, such as shop.example.com.
The page has two forms and a table of every address your shop has. A custom domain is connected in three steps: you add a DNS record, you press Verify DNS, and then you press Make primary. A domain must be verified before it can be made primary.
Only the Owner can claim, connect, verify or make a domain primary. Managers can open this page and read it, but the buttons are refused for them.
Screen tour
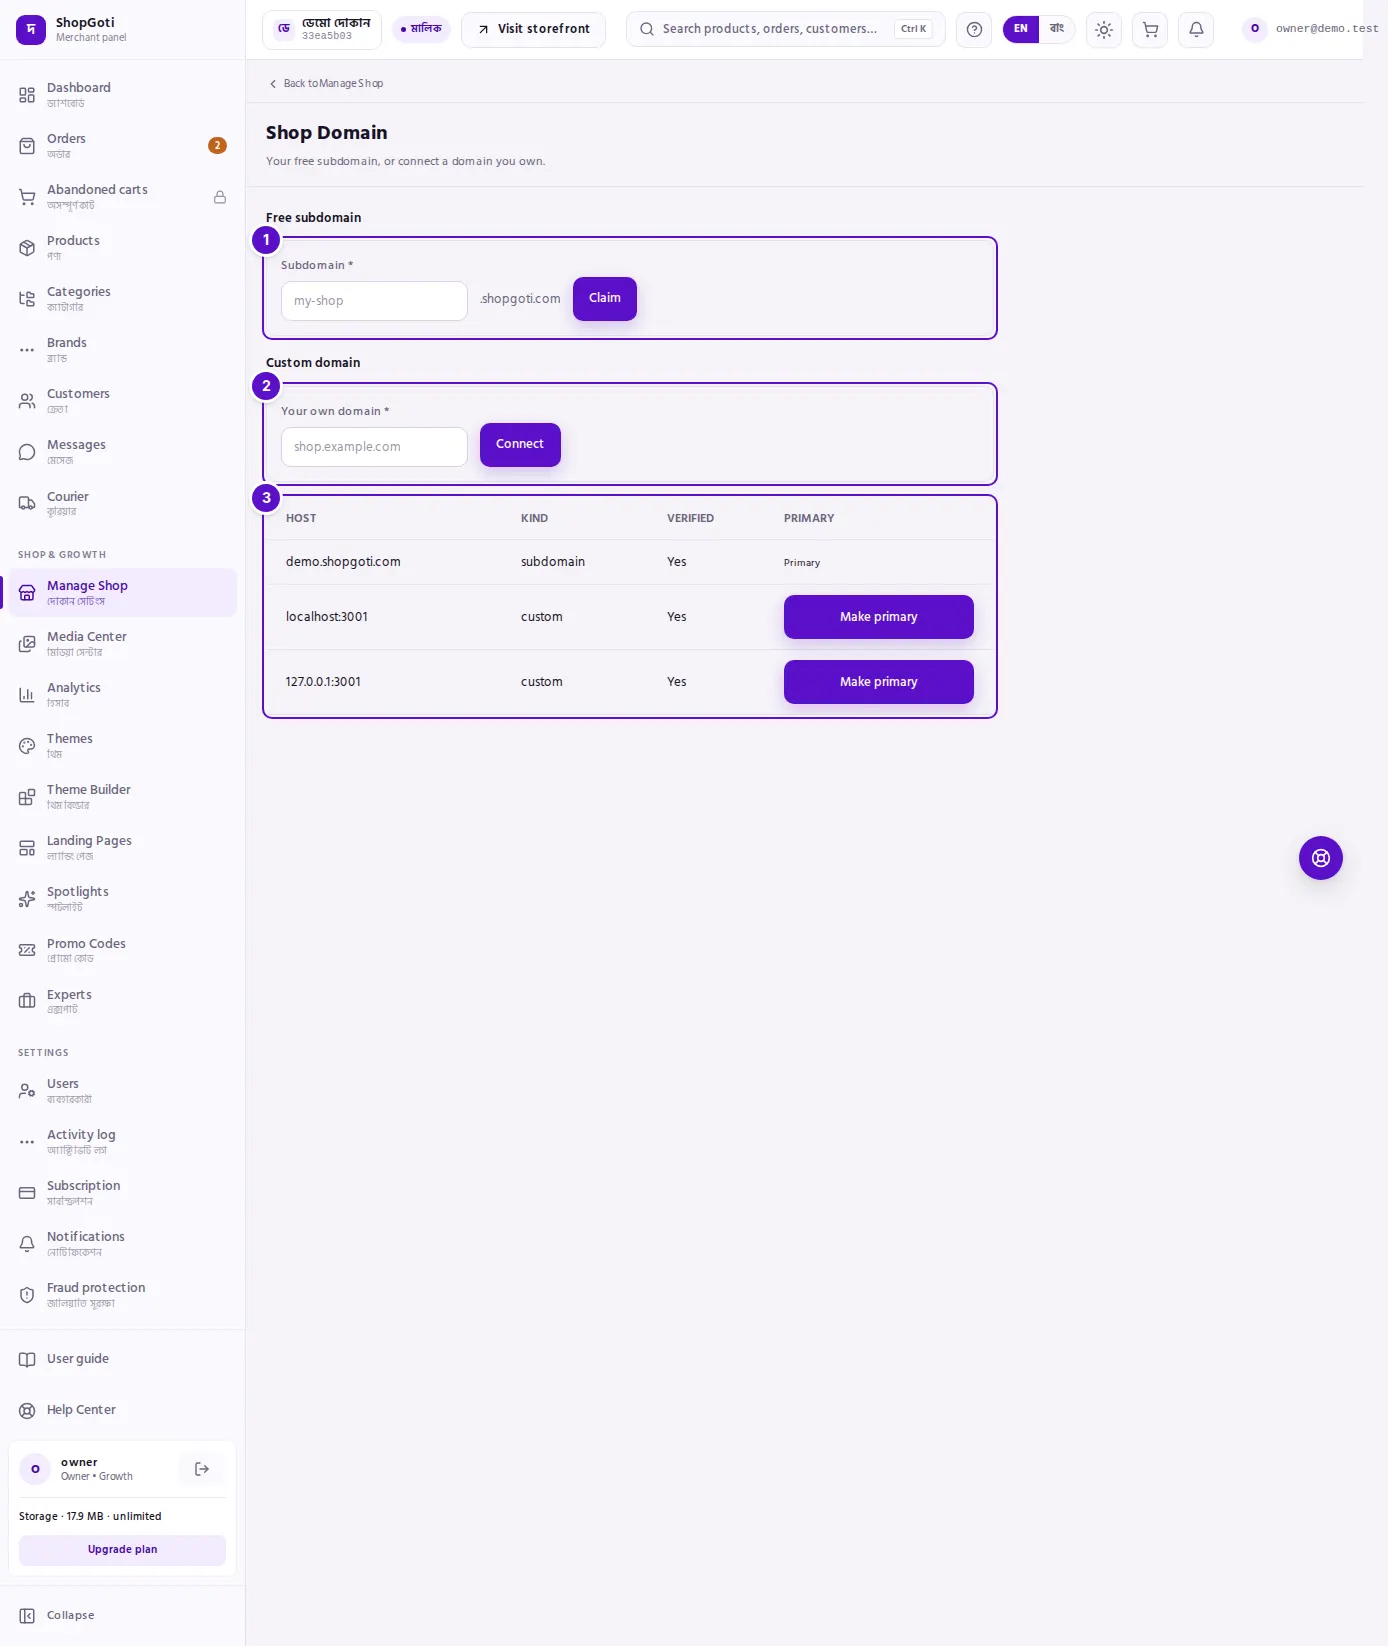
- Free subdomain — the Subdomain box with the
.shopgoti.comending, and the Claim button. - Your own domain — the Your own domain box and the Connect button. On a package without a custom domain, this section shows a note instead of the form.
- The address table — one row for each address. Its columns are Host, Kind, Verified and Primary. A pending domain shows a DNS box under its name, with the record to add.
Steps
Claim or change your free subdomain
Steps
- In Subdomain, type the name you want. Use 3 to 30 characters: small letters (a–z), digits (0–9) and hyphens. The placeholder shows
my-shop. - Check the ending .shopgoti.com beside the box.
- Press Claim.
- If the name is taken or reserved, a message says so and your address does not change.
Claiming a new name changes your free address.
Connect your own domain
Custom domains are included in Starter and above. On the Free package, the section says: "A custom domain is not included in your plan."
Steps
- In Your own domain, type the host, such as
shop.example.com. - Press Connect. The domain appears in the table as Pending DNS.
- Under the domain's name, read the DNS box. It lists three things: Type (TXT), Name and Value.
- In your domain provider's DNS settings, add a TXT record with that name and value. The name starts with
_shopgoti-verify.followed by your domain. - Wait 5 to 30 minutes after you add the record.
If your provider does not let you add a TXT record under a subdomain, the DNS box also says you can put shopgoti-verify= followed by the value as a TXT record on the domain itself.
Verify the domain and make it primary
Steps
- In the table, find the domain row that shows Pending DNS in the Verified column.
- Press Verify DNS. When the check passes, the column shows Yes and the button changes to Make primary.
- Press Make primary. The row now shows Primary in the last column.
If the check does not pass, wait a little longer, check that the record name and value match the DNS box exactly, and press Verify DNS again.
Fields
| Field | Required | What it does |
|---|---|---|
| Subdomain | Yes | The name before .shopgoti.com. Three to 30 characters, small letters, digits and hyphens. |
| Your own domain | Yes, to connect a domain | The full host name, such as shop.example.com. Starter and above. |
The address table
| Column | What it shows |
|---|---|
| Host | The address, and under it the DNS box for a pending domain. |
| Kind | The type of address. The panel shows the word subdomain or custom. |
| Verified | Yes when the address is live, or Pending DNS while it waits for the DNS check. A free subdomain shows Yes from the start. |
| Primary | Make primary for a verified domain that is not the main one, Verify DNS for a pending one, and Primary for the main address. |
Tips and common mistakes
- Verified and primary are different steps. A domain can be verified without being the main address. The main address is the one that buyers see by default.
- A free subdomain is live straight away. It shows Yes in Verified without a DNS check.
- DNS changes take time. A record can take 5 to 30 minutes to be seen. Waiting before you press Verify DNS again avoids confusion.
- Check the record name carefully. The most common reason a check fails is a missing or different record name.
- Managers see the page, but cannot change domains. Ask the Owner to claim, connect, verify or make a domain primary.