11.1Media Center
Keep every picture your shop uses in one library — folders, uploads with cropping, stock photos, choosing a picture on other screens, the Chat folder of files sent in chats, deleting, and the storage your package includes.
- Menu:
- Media Center
- Who:
- Owner · Manager · Staff
- Package:
- All packages
- Updated:
- 2026-10-29
Overview
The Media Center holds the pictures your shop uses: product photos, logos, banners, category pictures and theme images. You can keep them in folders that you name yourself. Files sent in Messages are kept here too, in a folder called Chat.
The main library (the top level, with no folder open) holds product photos. The product picker reads only the main library, so a product photo uploaded into a folder will not appear when you add a product. Banners, logos and other content belong in folders.
Owners, Managers and Staff can open Media Center and see every picture. Staff can also pick pictures for products and other screens. Creating, renaming and deleting folders, uploading and deleting pictures are for Owners and Managers only; the panel refuses those changes for Staff.
Your package sets how much storage the library may use:
- Free: 200 MB
- Starter: 5 GB
- Pro: 10 GB
- Growth: no limit
Screen tour
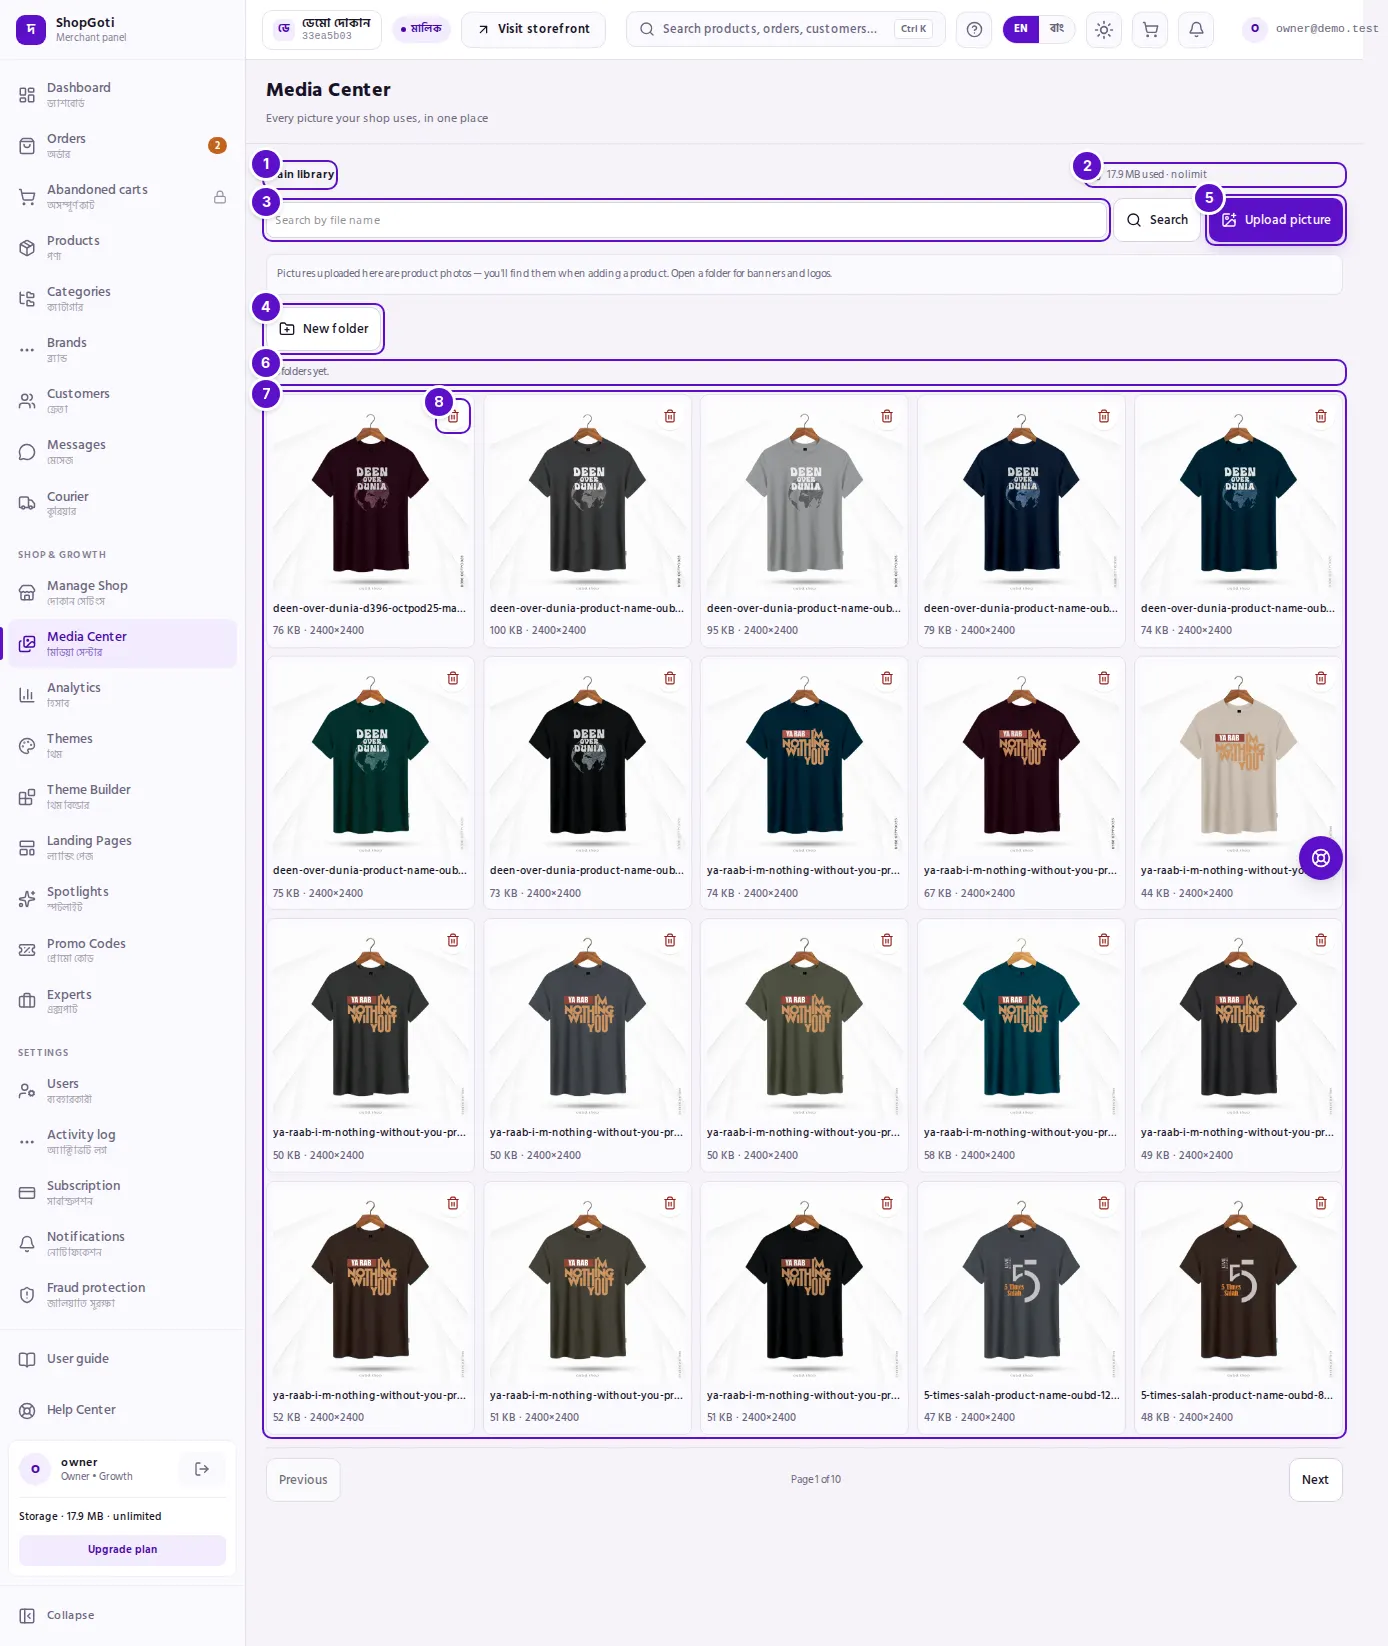
- Breadcrumb — Main library, or the folder you have open after it. Press Main library to go back to the top.
- Storage meter — how much you have used of your limit. Amber from 80%, red at 100%, with the line Storage is full. On an unlimited package it shows the amount used and no limit, with no bar.
- Search by file name — type part of a name and press Enter, or press Search.
- New folder — creates a folder. It appears only in the main library. Inside a folder, the same place shows Rename and Delete instead.
- Upload picture — chooses a JPG, PNG or WebP file, up to 4 MB, and opens the crop step before it is sent.
- Folders — one tile per folder with the number of pictures in it. Press a tile to open it. On a new shop this reads No folders yet.
- Pictures — 20 to a page. Each shows its name and its size and width × height.
- Delete (the trash icon on a picture's corner) — deletes that picture after you confirm.
The Stock photo button also sits in the toolbar. It appears only when a stock-photo provider is set up for your shop.
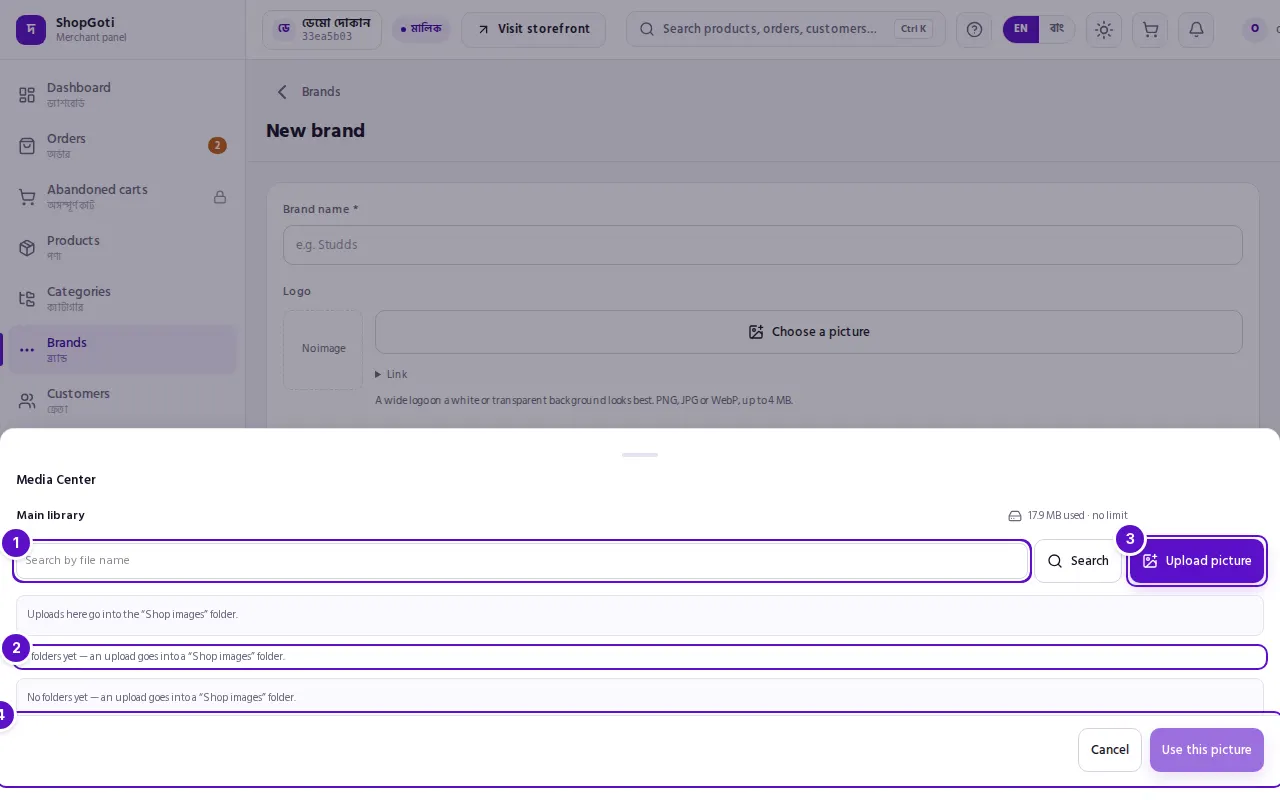
- Search — the same search as the Media Center page.
- Folders — in the main library, the picker shows folders only. Open one to see its pictures.
- Upload picture — uploads a new picture. With no folder open, it goes into Shop images.
- Use this picture — the bar at the bottom. It fills the field on the screen behind the sheet.
Steps
Make a folder
Steps
- Open Media Center. The breadcrumb should read Main library.
- Press New folder.
- Type the name in Folder name. Press Enter or Create. Press Cancel to stop.
Rename or delete a folder
Steps
- Press the folder's tile to open it.
- To rename it, press Rename. A box opens with the current name; change it and press OK.
- To delete it, press Delete. If the folder still holds pictures, the panel says This folder still holds pictures. Delete them first. and stops. Delete the pictures in it first, then delete the folder.
- Confirm Delete this folder? with OK.
Upload a picture
Steps
- Press Upload picture and choose a JPG, PNG or WebP file, up to 4 MB.
- The sheet Adjust the picture opens. Choose a shape with the icons: As is, Square, Wide or Tall. Drag a corner to resize, or drag inside the frame to move.
- Use the Zoom slider to enlarge the picture, and Rotate to turn it in 90° steps. Reset puts everything back.
- To keep the picture as it is, press Use as it is. Otherwise press Done after framing it.
- The picture uploads. The panel stores it as a WebP file, so the size you see afterwards is the stored size. The new picture appears at the top of the first page.
Add a stock photo
Only when a stock-photo provider is set up for your shop. Stock photos come from Pixabay, Pexels, or both, as the shop is set up.
Steps
- Press Stock photo.
- Type a word and press Search, or press Enter. If both providers are set up, a switch lets you choose one; switching searches again with the same word.
- Press a photo. It is saved straight into the open folder (or Shop images), with no cropping step.
- Each photo shows its photographer. The sheet also credits the provider.
Find a picture
Steps
- Type part of the file name in Search by file name and press Enter, or press Search.
- Inside a folder, the search looks only in that folder. In the main library, it searches every folder and every picture.
- To go back to the folders, clear the box and press Search.
- Use Previous and Next at the foot of the list to move between pages.
Delete a picture
Steps
- Press the trash icon on the picture's corner.
- Read the question Delete this picture? and its warning, then press OK.
- If a product uses the picture, the panel refuses and names the product. Remove the picture from that product first, then delete the picture again.
- The picture is gone at once and its storage is freed. It cannot be undone.
Choose a picture from another screen
Steps
- On a screen with a Choose a picture button — for example the Logo of a brand, or the Wide banner of a category — press it.
- The Media Center sheet opens. In the main library it shows folders only: open a folder to see its pictures.
- To use a new picture, press Upload picture. With no folder open, the upload goes into Shop images, which the panel creates the first time you need it.
- Pick the picture and press Use this picture. The picture fills the field. Save the screen to keep it.
- On a product, Add Image opens the same sheet at the main library, for product photos.
Find the files sent in chats
Steps
- In the main library, press the Chat folder. The panel makes it the first time a file is sent in a chat, by you or by a buyer, and makes it again if you delete or rename it.
- A picture shows as a thumbnail, like any other. A PDF, DOC or DOCX file shows as a file tile: its type, its name and its size.
- Press a file tile to download the file. Documents are never offered on the screens where you choose a picture (a logo, a banner, a product), so a PDF can never end up as one. The pictures in the Chat folder can be chosen there like any other picture in a folder.
- To delete a file, press the trash icon on its corner and confirm Delete this file? The chat keeps its card, but the link stops working, and a deleted picture shows File removed there.
- Deleting a message in Messages removes its file from this folder too, and gives the storage back. If the file cannot be removed — a product still uses that picture, for example — it stays here, and you can delete it yourself.
Check your storage
Steps
- Look at the storage line at the top of the Media Center. It reads X of Y used, or X used · no limit on an unlimited package.
- The bar turns amber at 80% and red at 100%.
- When the storage is full, uploads are refused with Your storage is full. Delete some pictures, or move to a bigger package. Sending a file in Messages is refused too, with Your file storage is full. Delete files in the Media Center, or upgrade your package. Delete the files you do not need, or move to a bigger package from Subscription.
Fields
| Field | Required | What it does |
|---|---|---|
| Folder name | Yes, to make a folder | Up to 80 characters. Cannot contain / or \. Must differ from your other folders. |
| Search by file name | No | Finds pictures by part of the file name. Runs when you press Enter or Search. |
| Shape (As is, Square, Wide, Tall) | No | Locks the crop frame to a shape. As is leaves the frame free. |
| Zoom | No | Enlarges the picture inside the frame. |
| Rotate and Reset | No | Turns the picture 90° each press; Reset clears the crop, zoom and rotation. |
| Use as it is | No | Uploads the picture exactly as chosen, with no crop. |
| Stock search | No | A word to search the stock-photo provider for. |
Tips and common mistakes
- Make folders for each kind of picture, such as Banners, Logos or a campaign name. Then the product picker stays clean.
- A product photo uploaded in the main library is found by the product picker. A banner uploaded there is also a product photo, so put banners and logos in a folder.
- The storage bar counts the stored size of each picture. Deleting a picture frees room straight away.
- Crop a picture to the shape you need before you upload it, so the frame you see on screen is the one buyers see.
- Check the storage bar before a big upload session. When the bar is red, uploads are refused until you delete something or move to a bigger package.
- Files sent in chats, by you or by buyers, use your storage like any picture. Check the Chat folder from time to time and delete what you no longer need.
- A folder only organises pictures. A picture in a folder can still be used by a product, a banner or a category.
Related pages
- Categories — the category pictures you choose here: the wide banner, the square image and the size chart.
- Brands — the logos you choose here.
- Messages — where you send and receive the files kept in the Chat folder.