5.1Categories
Build the category tree of your shop — add, nest, reorder, search, edit and remove categories, and give each one its pictures.
- Menu:
- Categories
- Who:
- Owner · Manager · Staff
- Package:
- All packages
- Updated:
- 2026-10-15
Overview
Categories sort the products of your shop into a tree, for example Men → T-shirts. Buyers see this tree as your shop menu, so the names and the order you set here are the names and the order buyers see.
Owners, Managers and Staff can all open Categories. Only Owners and Managers can add, edit, reorder or remove a category. Staff see the same tree without the buttons. If Staff open the add or edit page directly, the panel sends them back to the list.
The tree goes three levels deep. A category holds no products by itself: products are put into a category on the product page.
Screen tour
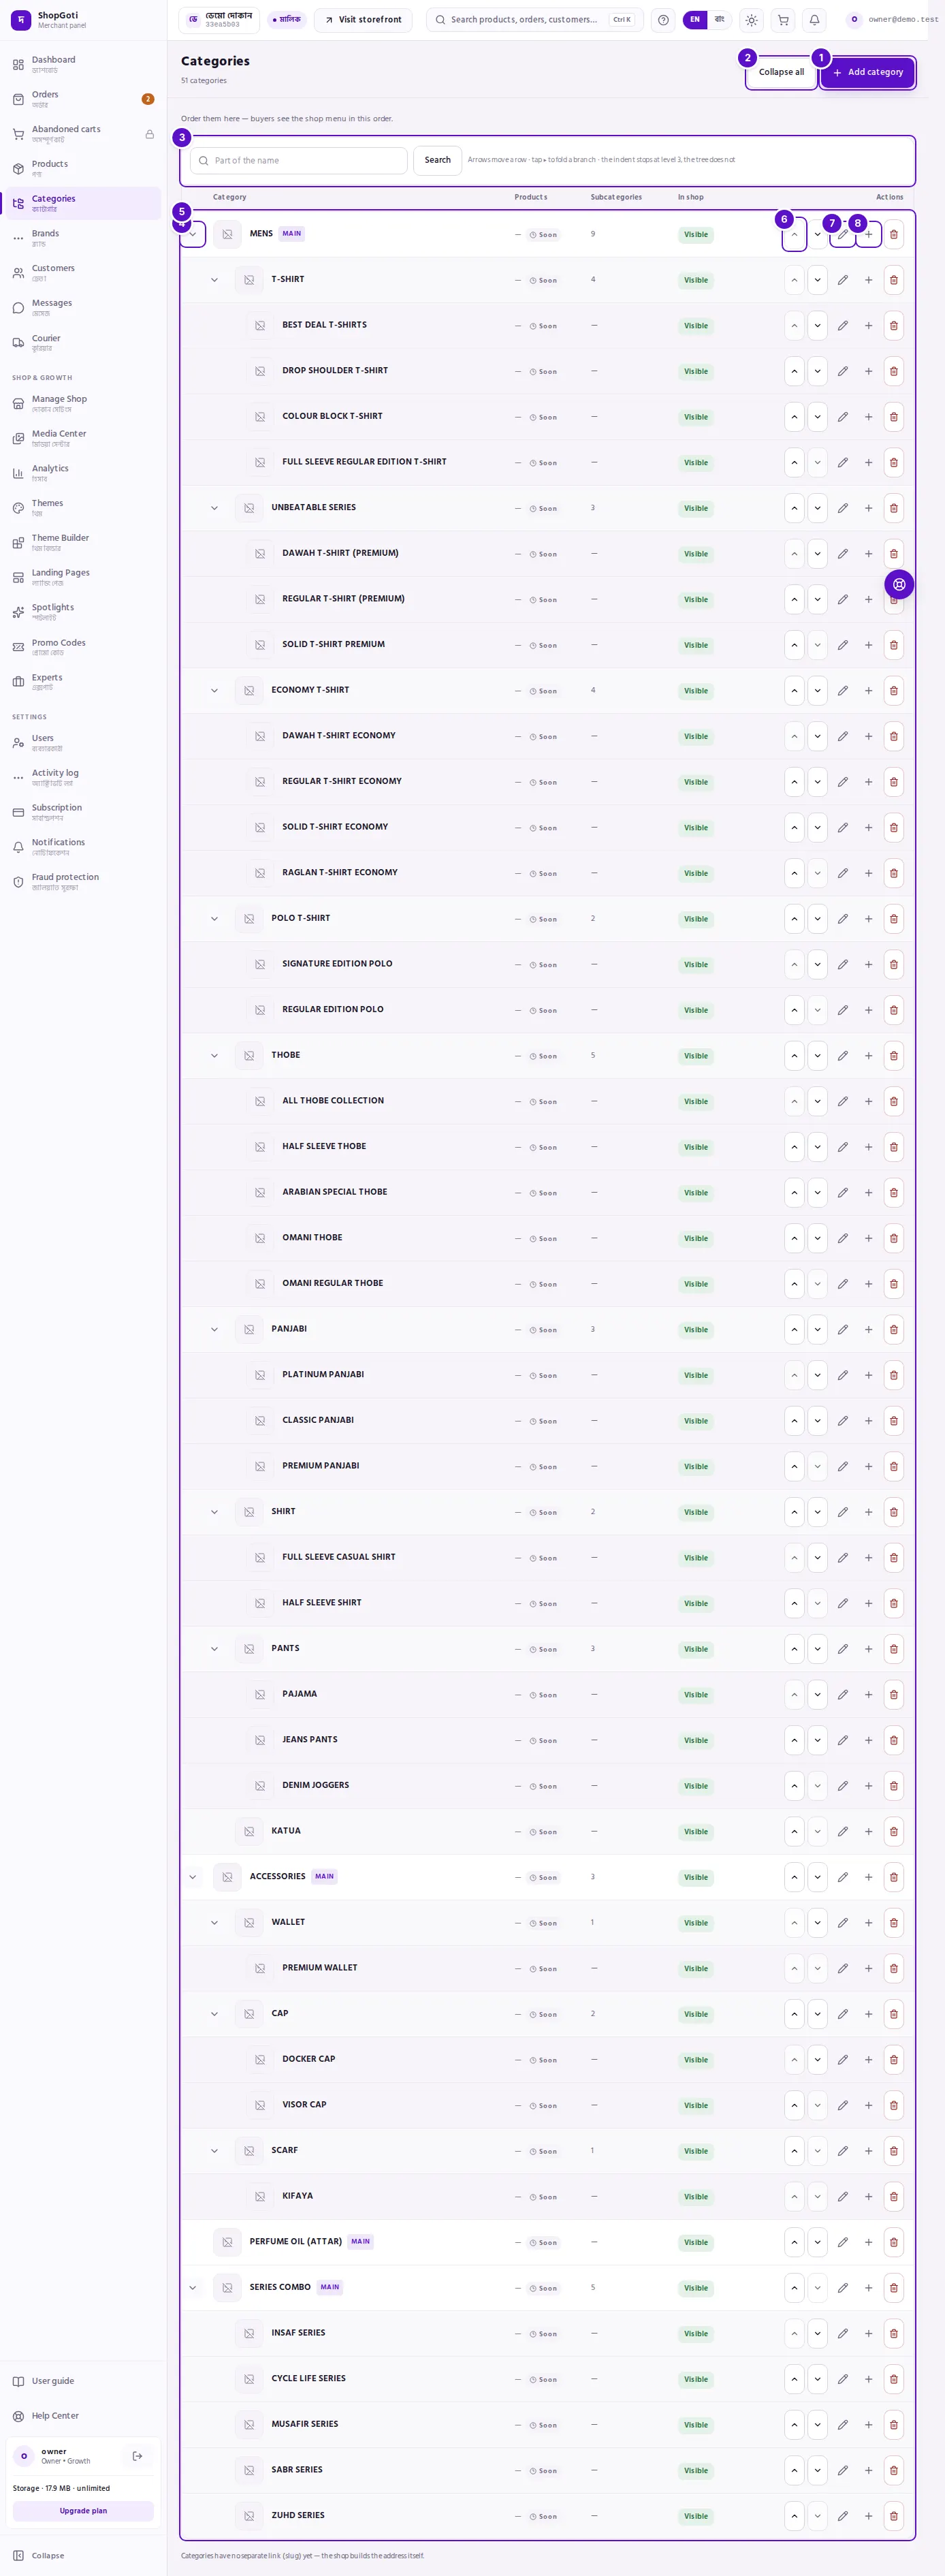
- Add category — opens the form for a new category.
- Collapse all (or Expand all) — folds or opens every branch. It is hidden while you are searching.
- Find a category — type part of a name and press Search.
- Branch arrow (▸) — folds or opens one branch. A row with no categories under it has no arrow.
- Columns — Category (picture, name and a MAIN badge on top-level categories), Products (not counted yet: it shows a dash and Soon), Subcategories (how many sit directly under the row), In shop (Visible or Hidden) and Actions.
- Move up and Move down — swap the row with its neighbour at the same level.
- Edit — opens the category's own edit page.
- Add subcategory — opens the form with this row already chosen under Sits under.
On a phone each row has one actions button (three dots) instead of the icons. It holds Edit, Add subcategory, Move up, Move down and Remove.
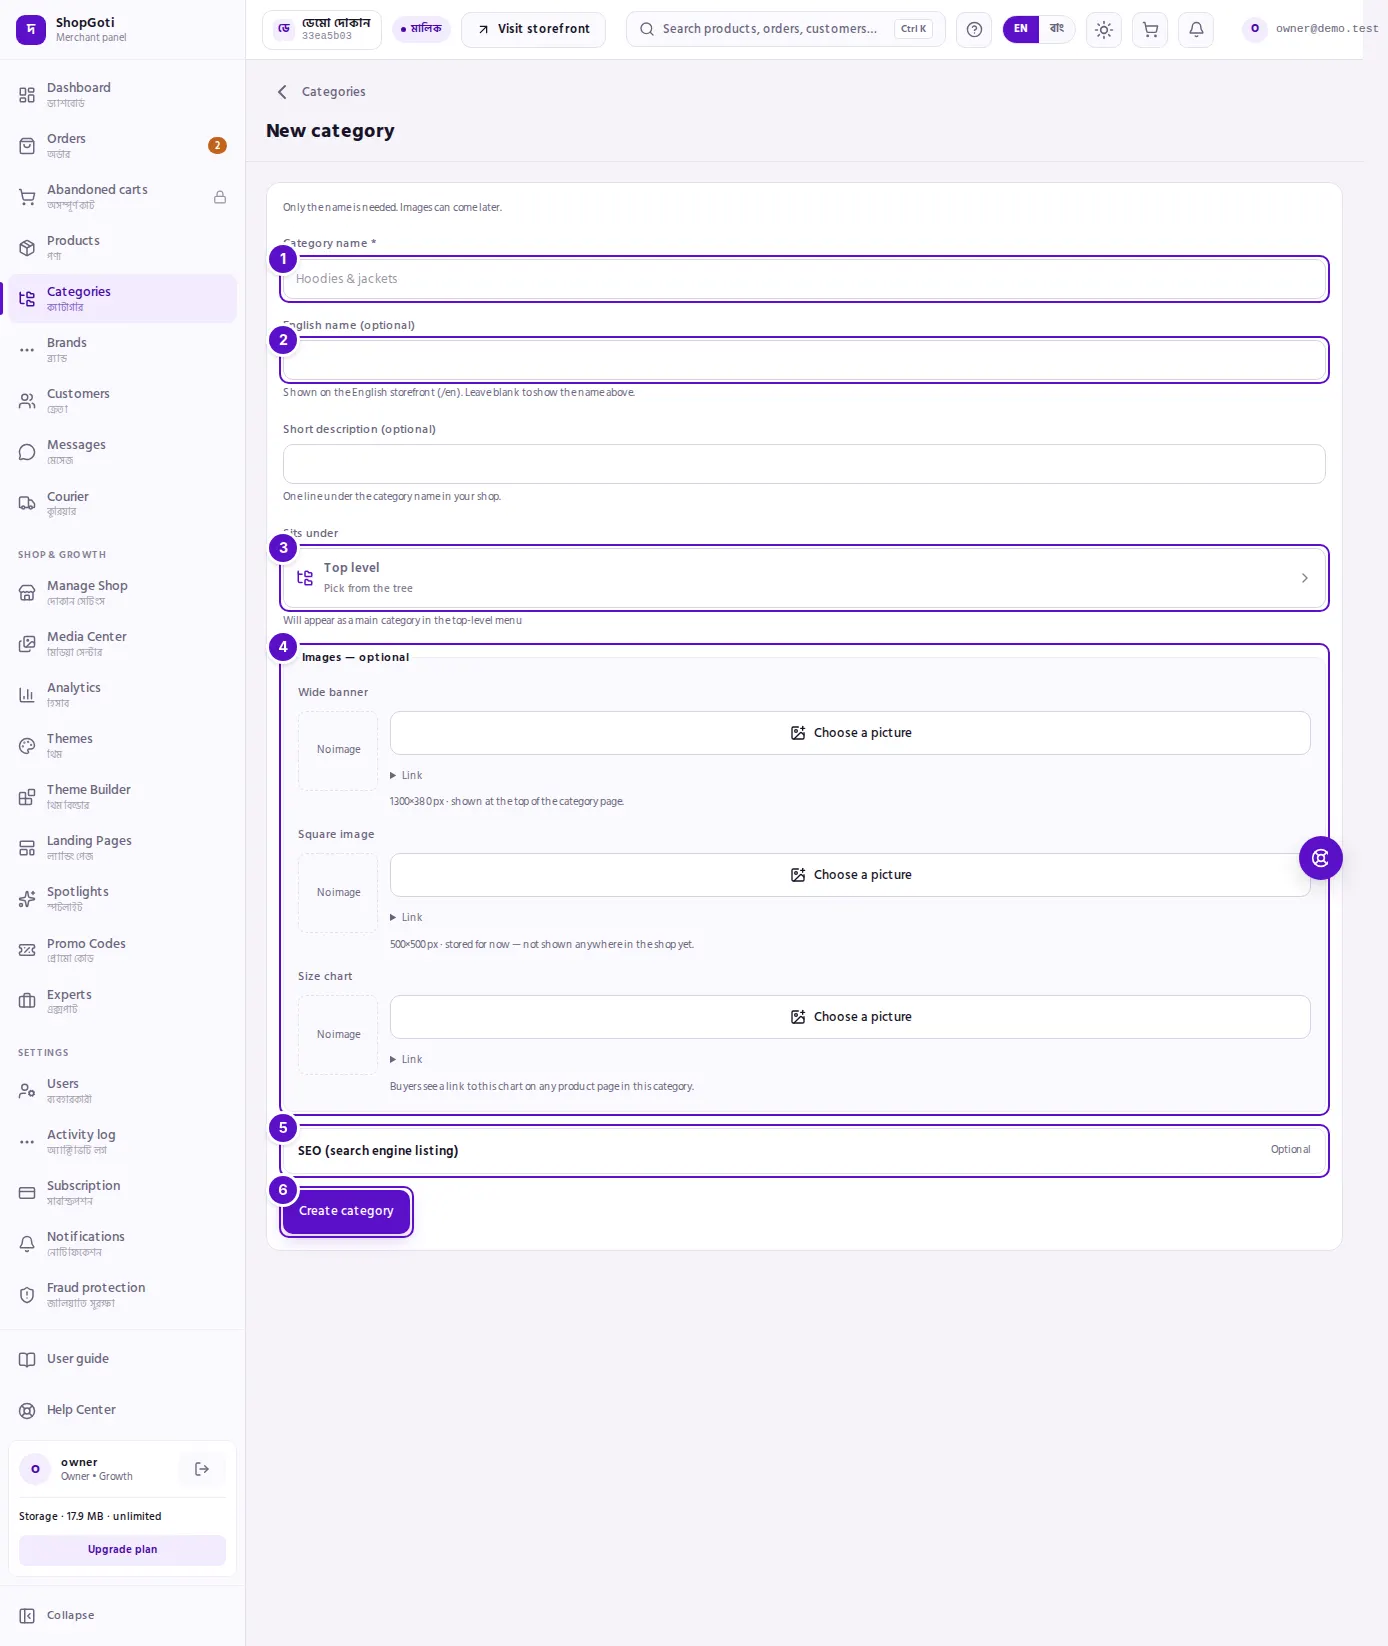
- Category name — the only required field.
- English name (optional) — the name shown on the English storefront (/en).
- Sits under — the parent picker. It shows Top level until you choose a category.
- Images — optional — the wide banner, the square image and the size chart.
- SEO (search engine listing) — the title and description Google shows for this category. Optional.
- Create category — saves the category and returns you to the list.
The edit page (Edit category) has the same fields, with Save in place of Create category. It opens from the edit icon on the row.
Steps
Add a category
Steps
- Open Categories and press Add category.
- Type the name in Category name.
- Optional: type the English name in English name (optional), and one line for buyers in Short description (optional). The line appears under the category name in your shop.
- Leave Sits under on Top level for a main category. To file it under another category, see "Nest a category or move it".
- Optional: add pictures and the search listing.
- Press Create category. The list opens and shows Category created.
Add a subcategory from a row
Steps
- On the list, press the Add subcategory icon on the parent's row. On a phone, open the row's actions button (three dots) and press Add subcategory.
- The form opens with Sits under already set to that parent.
- Type the name and press Create category.
Nest a category or move it
Steps
- On the category's row, press Edit. On a phone, open the actions button and press Edit.
- Press the Parent field. The category tree opens.
- Choose the new parent. Choose Top level to move the category to the top.
- Press Save. The list shows Category saved.
Set or change a picture
Steps
- On the form, press Choose a picture under Wide banner, Square image or Size chart. On the edit page these fields are called Banner image, Square image and Size chart.
- The Media Center opens. Pick a picture, or upload a new one. The Media Center page explains uploads and cropping.
- Press Use this picture. The picture appears in the field.
- Press Save (or Create category). The picture is kept only when you save the form.
- To clear a picture, press Remove under it. This empties the field and takes effect when you save.
- To use a web address instead, open Link under the field and paste the address into Or paste an image link.
Reorder categories
Steps
- On the list, press Move up or Move down on the row you want to move. On a phone, open the actions button and press Move up or Move down.
- The row swaps places with its neighbour at the same level. A subcategory is ordered only among the categories under the same parent.
- A greyed-out arrow means the row is already first or last at its level. Nothing happens when you press it.
Search and fold the tree
Steps
- Type part of the name in Find a category and press Search.
- The matches appear as one flat list. Each row shows its branch, for example Men › T-shirts. The arrows are hidden while you search, so results cannot be reordered.
- Press Clear the search to go back to the tree.
- Press Collapse all to fold every branch, or the ▸ arrow beside one row to fold that branch. Press Expand all to open them again.
Remove a category
Steps
- On the row, press the Remove (trash) icon. On a phone, open the actions button and press Remove.
- On a phone the panel asks Remove "…"? It will leave your shop's menu. Press OK to confirm. On a computer the category is removed as soon as you press the icon, with no question asked.
- Check the list. The categories under the removed one move up a level, to its own parent or to the top.
Fields
| Field | Required | What it does |
|---|---|---|
| Category name | Yes | The name in the list, the shop menu and the category page. |
| English name (optional) | No | Up to 50 characters. Shown on the English storefront (/en). Blank means the name above is used. |
| Short description (optional) | No | One line shown under the category name in your shop. |
| Sits under (Parent) | No | The parent category. The default is Top level. |
| Wide banner (Banner image) | No | Suggested size 1300×380 px. Shown at the top of the category's page in the shop. |
| Square image | No | Suggested size 500×500 px (1:1). Shown as the category's picture in category tiles on the home page of several themes. A theme without one uses the banner. |
| Size chart | No | Buyers see a link to this chart on product pages in the category. |
| SEO title and Meta description | No | How the category page appears in Google. Blank means the panel writes one from the name and the shop name. |
Tips and common mistakes
- Buyers scan the top level first. Keep the main categories few and clear.
- Two categories cannot share a name. If the name is taken, the panel says so and asks for another.
- The order you set with the arrows is the order of your shop menu. Check it on the storefront after you change it.
- The Products column is not counted yet. A dash there does not mean zero products.
- Hidden means buyers do not see the category in the shop menu. A hidden category cannot be removed from this list.
- To file a product under a category, use the category picker on the product page. Removing a category leaves its products uncategorised.
Related pages
- Brands — the other way to group what you sell: by maker.
- Media Center — where the pictures for banners and square images come from.