4.2Add a product
Add a product in three steps — Product, Price & Stock, Publish — with every field, the variant builder, photos from the Media Center, the Google listing, the advance payment, and what each save button does.
- Menu:
- Products
- Who:
- Owner · Manager · Staff
- Package:
- All packages
- Updated:
- 2026-10-15
Overview
Press Add Product on the products list to open the form. It is one form split into three steps, shown as a bar across the top:
- Product — name, descriptions, photos, video, category, brand, condition and origin.
- Price & Stock — selling price, the optional regular and buying prices, stock or variants, product code (SKU), unit and serial.
- Publish — visibility, web address, weight and size, Google listing, warranty, extra details, delivery charge and advance payment.
Only Owners and Managers can add products. Staff who open the add page are sent back to the list.
Two things are always required: a name and a selling price above 0. That is true even for a draft. Everything else is optional.
Nothing is saved until you press Save as draft or Publish. Moving between steps keeps everything you typed, so pressing Publish on step 3 saves the whole product.
Screen tour
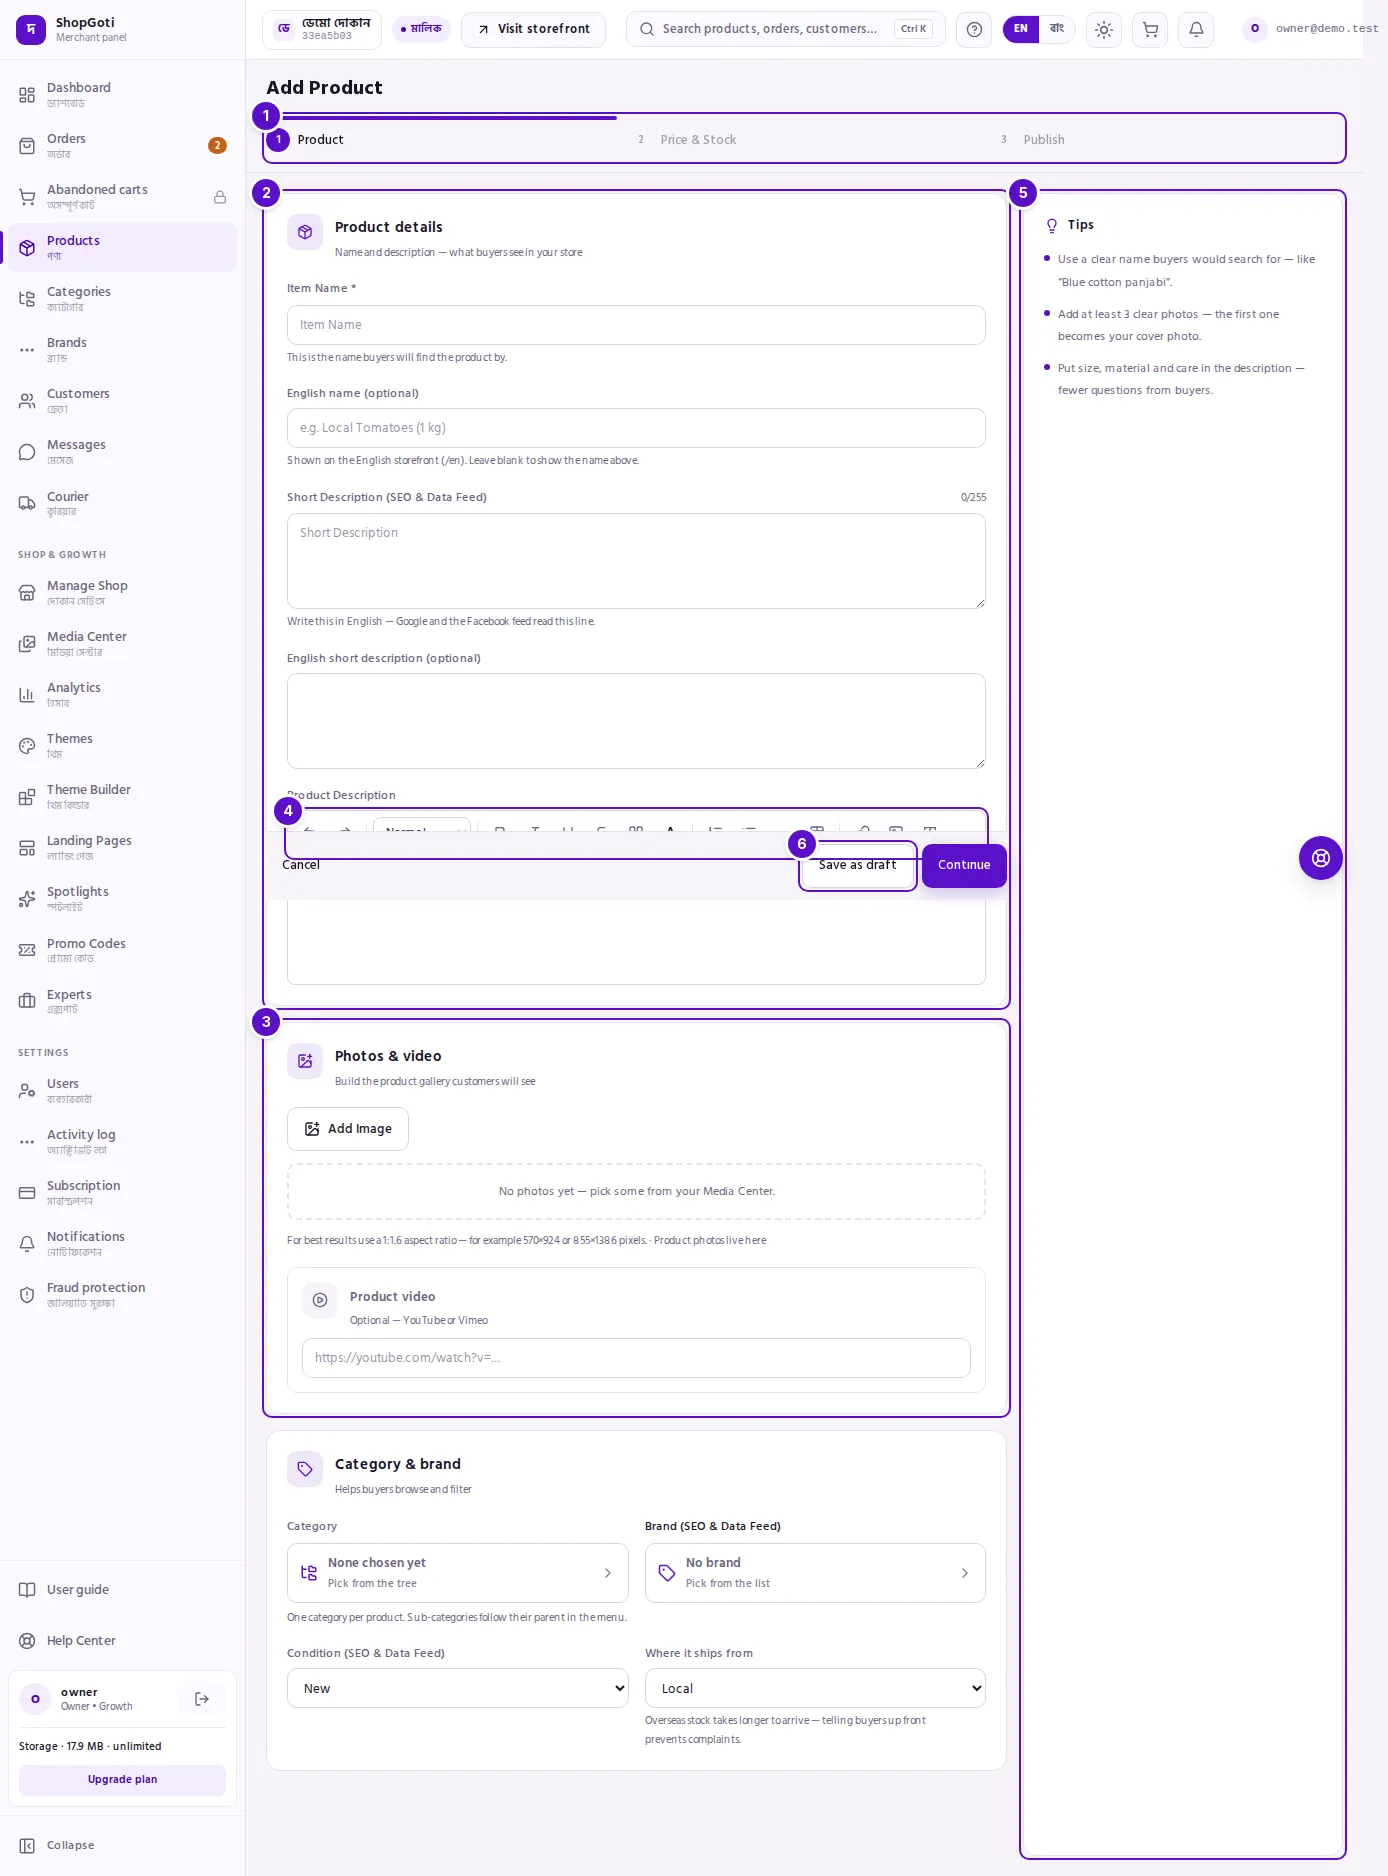
- Step bar — the three steps. On a wide screen you can press any step you have already reached. Going forward to a new step uses Continue. On a phone the bar reads "Step 1 of 3 · Product".
- Product details — Item Name, the English name, the short descriptions and the Product Description editor.
- Photos & video — Add Image opens the Media Center. The first photo you add is the main one.
- Description toolbar — formatting buttons for the product description: block style, bold, italic, underline, strikethrough, quote, colour, lists, a line, a table, a link, an image address, and undo and redo.
- Tips — three tips for the step you are on.
- Save as draft — saves the product hidden. It is available on every step.
The Category & brand and Stock & Inventory cards are further down the step, so the screenshot shows only the first part.
Steps
Write the name and description
Steps
- In Item Name, type the name buyers will search for. This field is required.
- If you sell in English as well, type the English name (optional) and the English short description (optional). Leave them blank and the Bengali text shows on the English storefront.
- Type the Short Description (SEO & Data Feed). A counter shows how many characters you have used out of 255.
- Write the Product Description in the editor. Use the toolbar to format it. The block picker offers Normal, Heading and Subheading. The table button inserts a 3 × 3 table. While the cursor is in a table, Add row, Add column and Delete table appear.
- To add a link, select the words, press Link, and type the address. To remove a link, press Link and clear the address.
Add photos from the Media Center
Steps
- Under Photos & video, press Add Image. The Media Center opens as a panel.
- Tap one or more pictures to select them. The button at the bottom reads Use this picture, or Use N pictures when you have chosen more than one. Press it to add them to the product.
- To add a new picture, press Upload picture in the panel and choose a JPG, PNG or WebP file. The picture opens in an adjuster: zoom, rotate or change its shape, then press Done. Press Use as it is to skip the adjusting. The new picture is saved to your Media Center and selected at once.
- The first picture becomes the Main image. It is shown large with the note Cover photo. Other pictures appear as small thumbnails.
- To remove a picture, press Remove image under the main image, or the × on a thumbnail.
- To change the order, remove the pictures in front and pick them again in the order you want.
Add a video
Steps
- Under Photos & video, find Product video. It is optional and takes a YouTube or Vimeo link.
- Paste the video's web address into the box. The box shows an example,
https://youtube.com/watch?v=….
Choose the category and brand
Steps
- Under Category & brand, press the Category button. Choose a category from the tree. Open a branch with Expand branch if the category sits inside another one. A product has one category.
- If you have no categories yet, the card says No assigned category found and shows Create a category. That link leaves this form, and what you have typed is lost. Save a draft first, or create the category in another tab.
- Press Brand (SEO & Data Feed). Choose a brand from your list, or choose No brand.
- If the brand is not in the list, type its name in Search brands. An Add line appears with the name you typed. Press Add and the brand is created and selected at once. The line appears only when no brand already matches the name, so you cannot make a second copy of one you have.
Set condition and origin
Steps
- Open Condition (SEO & Data Feed) and choose New, Used or Refurbished. It starts as New.
- Open Where it ships from and choose Local or Overseas. It starts as Local.
- Read the hint under that field: overseas stock takes longer to arrive, so tell buyers up front.
Use the AI listing assistant
The card Write it with AI sits at the top of the Product step. It is shown only when your package includes AI listing help. It is hidden when your package has no AI quota, and when the platform has no AI service set up.
Steps
- In the Write it with AI card, choose a JPG, PNG or WebP photo of up to 4 MB. You can also type a name in Item Name, or do both.
- Press Draft it. The meter beside the title shows how much of this month's allowance you have used, or Unlimited.
- Read the draft. Press Use this name to copy the name into Item Name. Press Copy the description and paste it into the Product Description editor yourself.
Set the price
Steps
- Go to step 2, Price & Stock. Under Pricing, type the Sell/Current Price (৳). This is the price buyers pay. It is required and must be above 0.
- Optionally type the Regular/Old Price (৳). When it is higher than your selling price, the shop shows it crossed out, and the line Customers will see −N% off appears.
- Optionally type the Buying Price (Optional) (৳). The line Profit per sale: ৳… appears. Buyers never see this price.
- Press Continue to move to step 3, or press Back to return to step 1.
Set stock, or add variants
Steps
- Under Stock & Inventory, leave This product has variants off to keep one stock count.
- Type the number of items you have now in Quantity (Stock).
- To sell in sizes or colours, turn This product has variants on. The Quick add buttons and the option builder appear, and the single quantity box is replaced by a line that adds up the variants' stock.
Build variants
Turn on This product has variants first.
Steps
- Press a Quick add button: Sizes (S–XXL), Colours, Colour & Size, Weight (250 g–1 kg), Volume (100 ml–1 L) or Shoe sizes (39–44). The button fills in the option names and values in English, whatever language you use. It replaces any options you have already typed. Or press + Add an option to start your own.
- Type the option's name in Option name, for example Size or Colour. Type one value in Value, then press + Add value for each more value.
- To add a second option, press + Add another option, for example Colour. The table lists every combination of the options.
- In each row, type the Stock. To give that variant its own price, type a number in Price (৳). Leave it blank and the variant uses the product's price.
- The SKU column is filled in for you. Change it if you use your own codes.
- Press Pick image on a row to give that variant its own photo. The photo shows as a colour swatch on the storefront. Press Change or Remove image to manage it.
- To leave out a combination that does not exist, press the bin icon on its row, labelled Exclude this combination. The row then reads Excluded — will not be created. Press Add back to include it again.
- Read the line above the table: N variants · total stock M.
Add the product code, unit and serial
Steps
- Product code (SKU) is filled in from the product name. Change it if you have your own code. Press Generate a new code to make a different automatic one. Clear the box to return to the automatic code.
- Open Unit Name and choose kg, g, ml, l, piece, pack, pair, set or dozen. Choose Custom… to type your own unit, up to 20 characters.
- Product Serial starts with 0, and that 0 is saved if you leave it. Type your own serial number, or clear the 0 if you have none.
Set visibility and web address
This is step 3, Publish.
Steps
- Under Visibility & storefront, open Product Status and choose Visible (active), Hidden (draft) or Inactive. It starts as Visible (active).
- Optionally type a Web Address (URL), for example
blue-cotton-panjabi. Leave it blank and the address is made from the name. Once saved, the address does not change when you rename the product.
Add weight and size
Steps
- Under Weight & size — for delivery estimates, type the Weight (kg), for example 1.5.
- Type the Length, Width and Height in centimetres. They are labelled L, W and H.
Fill in the Google listing
Steps
- Open Search Engine Listing (Google SEO). It is open by default on this step.
- Type an SEO title and a Meta description, or leave them blank. A grey line inside each box shows what is used when a box is empty: the title becomes the name followed by your shop name, and the description becomes your short description or a ready-made English sentence.
- Each box has a counter that shows your length against the maximum.
- Read How it looks on Google to check the preview.
Add warranty, sold count and extra details
Steps
- Under Warranty & sold count, open Warranty and choose No warranty, 6 months, 1 year, 2 years, Lifetime or Custom…. For Custom…, type the terms in Warranty details.
- Initial Sold Count starts at 0. Type a number to show a starting sales count. It is display only and never changes real stock.
- Under Extra details (optional), press + Add a new field. Type a Label, for example Brand, and a Value, for example Walton. Repeat for each detail. Press Remove this detail to delete a row. A row with no label is left out.
Set delivery charge
Steps
- Under Delivery, read the line that shows your store-wide rates. To change those rates, go to Change in Manage Shop → Delivery.
- The switch Apply default delivery charges starts on. The product then uses your store rates.
- Turn the switch off to show Delivery charge for this product (৳). Type a charge that applies to this product only.
Ask for an advance
Steps
- Under Ask for an advance (optional), choose No advance, A fixed amount (per unit) or The delivery charge only.
- For a fixed amount, type Advance per unit (৳). The field is required. The hint says it cannot be more than the product price, and buying 5 means 5 times the amount.
- The buyer pays the advance to your own bKash or Nagad number. The rest is paid in cash on delivery.
Publish or save as draft
Steps
- On step 3, press Publish to save the product with the status you chose in Product Status.
- Or press Save as draft on any step to save the product hidden.
- The form opens the product's saved page. It shows Product published with It's live in your store, or Draft saved with It's saved as hidden; publish it whenever you're ready. From there you can press View my products, Add another product or Edit this product.
- If a photo does not upload, the product is still saved. The message says so, and you can add the photo again from the product's page.
Fields
| Field | Step | Required | What it does |
|---|---|---|---|
| Item Name | 1 | Yes | The name buyers search for. Up to 255 characters. |
| English name (optional) | 1 | No | Shown on the English storefront. Blank means the name above is used. |
| Short Description (SEO & Data Feed) | 1 | No | A line for listings and the Google feed. Up to 255 characters. |
| English short description (optional) | 1 | No | Shown on the English storefront. |
| Product Description | 1 | No | The full description, with the toolbar's formatting and tables. |
| Photos & video — Add Image | 1 | No | Pictures from the Media Center. The first one is the main image. |
| Product video | 1 | No | A YouTube or Vimeo link. |
| Category | 1 | No | One category, chosen from the tree. |
| Brand (SEO & Data Feed) | 1 | No | One brand from your list, or a new one added on the spot. |
| Condition (SEO & Data Feed) | 1 | No | New, Used or Refurbished. Starts as New. |
| Where it ships from | 1 | No | Local or Overseas. Starts as Local. |
| Sell/Current Price (৳) | 2 | Yes | What buyers pay. Must be above 0. |
| Regular/Old Price (৳) | 2 | No | Shown crossed out beside the selling price. |
| Buying Price (Optional) (৳) | 2 | No | Used only for your profit figure. Never shown to buyers. |
| This product has variants | 2 | No | Turns on the option builder in place of the single quantity box. |
| Quantity (Stock) | 2 | No | Stock count when the product has no variants. Cannot be negative. |
| Variant rows — Stock, SKU, Price (৳), Image | 2 | No | One row per combination. A blank price uses the product's price. |
| Product code (SKU) | 2 | No | Must be unique across your products. Generated from the name if blank. |
| Unit Name | 2 | No | A preset unit, or your own up to 20 characters. |
| Product Serial | 2 | No | Starts at 0. |
| Product Status | 3 | No | Visible (active), Hidden (draft) or Inactive. Starts as Visible (active). |
| Web Address (URL) | 3 | No | Made from the name if blank. Fixed once saved. |
| Weight (kg) | 3 | No | For delivery estimates. |
| Length, Width, Height (cm) | 3 | No | For delivery estimates. |
| SEO title and Meta description | 3 | No | Blank means the name and short description are used. |
| Warranty | 3 | No | No warranty, 6 months, 1 year, 2 years, Lifetime or Custom. |
| Warranty details | 3 | Only for Custom… | Your own warranty terms. |
| Initial Sold Count | 3 | No | Starts at 0. Display only. |
| Extra details — Label and Value | 3 | No | Rows with no label are left out. |
| Apply default delivery charges | 3 | No | On by default. Turn it off to set this product's own charge. |
| Delivery charge for this product (৳) | 3 | No | Shown only when the switch above is off. |
| Ask for an advance | 3 | No | No advance, a fixed amount per unit, or the delivery charge only. |
| Advance per unit (৳) | 3 | Yes, for a fixed amount | The advance a buyer pays per unit. |
Tips and common mistakes
- A draft still needs a name and a price. If either is missing, the form moves you to the step that needs it and marks the box.
- Enter does not save the form. Pressing Enter in a box does nothing, so you cannot save by accident.
- Cancel leaves without asking. Anything you typed is lost.
- Hidden or Inactive? Hidden (draft) keeps a product that is not ready yet. The list calls it Draft. Inactive is for a product you want to take out of the shop for a while, and it keeps its photos.
- Buying price is private. It is only used for your profit figure.
- Variant prices. A row with a blank price follows the product's price. Once you type a price in a row, that variant keeps its own price, even if you later change the product's price.
- Variant stock is per row. With variants on, the single quantity box is replaced. Set the stock in each row.
- Photo proportions. For the best result, use a 1:1.6 ratio, for example 570 × 924 or 855 × 1386 pixels.
- A duplicate SKU is refused. The message appears under the SKU box, and the form takes you to step 2.
- Serial shows 0. The serial box starts at 0. If you leave it, 0 is saved as the serial. Clear it if the product has none.
- Advance and packages. The advance is paid to your own bKash or Nagad number. On the Free package only cash on delivery is available, so an advance cannot be paid there. Set up payment methods in Manage Shop → Payment gateway.
- Something went wrong after saving. If the product is saved but some photos fail, the form tells you. Add the missing photos from the product's page.
Related pages
- Products list — finding, filtering and changing products
- Edit a product — changing a product after it is saved
- Import products from CSV — adding many products from a sheet
- Reviews — buyer reviews of a product