23.2Blocklist
Add the phone numbers or emails you do not want orders from, set how long each block lasts, and lift a block that was a mistake.
- Menu:
- Fraud protection
- Who:
- Owner · Manager · Staff
- Package:
- All packages
- Updated:
- 2026-10-15
Overview
The Blocklist tab holds the phone numbers and emails you do not want orders from. An order from a blocked number or email is stopped at checkout. The list shows why each entry was blocked, who added it, and until when it stays blocked.
There are two kinds of entry. Some were added by someone on your team (Added by staff). Others were added by the shop's own rules (Automatic rule). The limits for the automatic rule are set on the Rules tab.
- See the list — everyone (Owner, Manager and Staff).
- Add a number and lift a block — Owners and Managers only.
- Adding new numbers — needs the Starter plan or higher, or the Fraud blocklist add-on. On the Free plan you cannot add new numbers. Numbers you blocked before still work, and you can still lift them. In place of the form, the page shows a note and a See plans link.
Screen tour
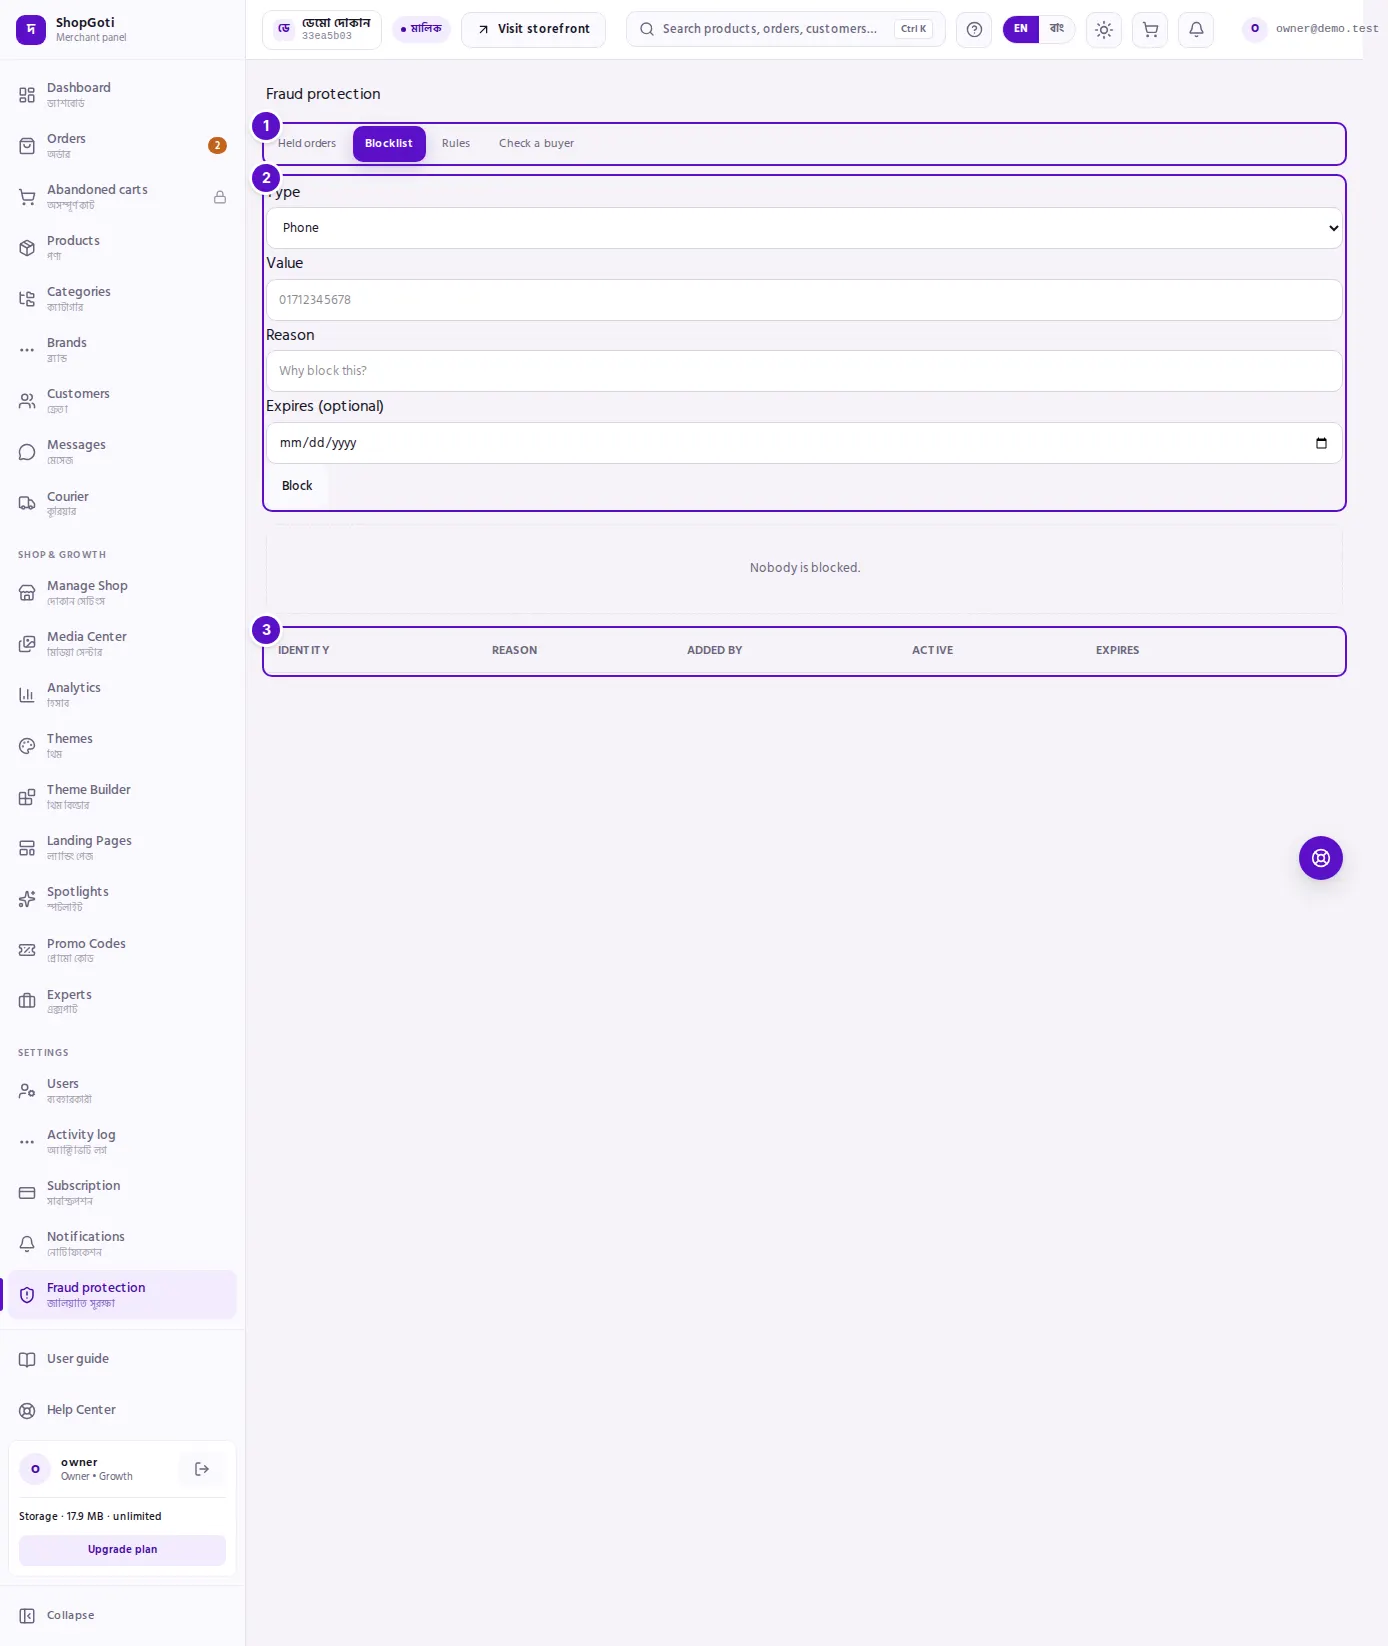
- Fraud protection tabs — check that the Blocklist tab is open.
- Add form — Type, Value, Reason, Expires (optional) and the Block button. Only Owners and Managers see it, and only on a shop that has this feature.
- The list — columns: Identity, Reason, Added by, Active, Expires, and a Lift button at the end. A lifted entry is greyed out.
Steps
Block a number
This needs the Owner or Manager role, and a shop that has the blocklist feature.
Steps
- Open Fraud protection from the menu and press the Blocklist tab.
- In Type, choose Phone or Email. The default is Phone.
- In Value, type the number or the email, for example
01712345678. - In Why block this?, type a reason. This box is required.
- In Expires (optional), choose a date. The block lasts until that date. If you leave it empty, the block never ends, and the list shows Never.
- Press Block. A new row appears in the list.
Lift a block
This needs the Owner or Manager role.
Steps
- In the list, find the row you want to lift. Press Lift at the end of the row.
- The row turns grey, and the Active column shows Lifted.
Lifting an entry does not delete it. The row stays in the list, so you can see later that this number was blocked before.
Tell an automatic block from a staff block
Steps
- Open the Blocklist tab.
- Read the Added by column. Automatic rule means the shop's rules added the number. Added by staff means a person added it.
- To change the limits for automatic blocks, open the Rules tab.
Fields
The add form has four fields.
| Field | Required | What to type |
|---|---|---|
| Type | Yes, default Phone | Phone or Email |
| Value | Yes | The phone number (for example 01712345678) or the email address |
| Why block this? | Yes | The reason for the block, kept short. A clear reason is still useful months later |
| Expires (optional) | No | The date the block ends. If empty, the block never ends |
Tips and common mistakes
- Write a reason. Without one, nobody can tell months later why a number was blocked, so nobody dares to lift it.
- An empty expiry means forever. Pick a date if the block should end. If you leave it empty, the list shows Never.
- Lifting is not deleting. A lifted row stays, greyed out, with its history.
- Free plan. You cannot add new numbers on the Free plan. The note on the page tells you how to add the feature. Blocks you made earlier still work.
- Automatic blocks can be lifted too. If a rule blocked a buyer you trust, press Lift. To change when the rule blocks, go to the Rules tab.
Related pages
- Held orders — the orders that were held, and why
- Rules — how many returns cause an automatic block, and for how many days
- Check a buyer — check a buyer before you take the order