19.1Users
Invite staff by email or phone, choose Staff or Manager, change a member's role, remove a member — and what Owners and Managers may do on this page.
- Menu:
- Users
- Who:
- Owner · Manager
- Package:
- All packages
- Updated:
- 2026-11-08
Overview
The Users page lists everyone who can open this shop and lets you invite more people. Every member has one role: Owner, Manager or Staff. The role decides which menu entries that person sees.
Who can do what:
- Owner — invites people, changes any other member's role, and removes a member.
- Manager — sees the list and invites people as Manager or Staff. A Manager does not see the role menu or the Remove button.
- Staff — has no access. If a Staff member opens the page's address, the panel sends them back to the dashboard.
Only Owners and Managers see Users in the rail, under Settings.
Screen tour
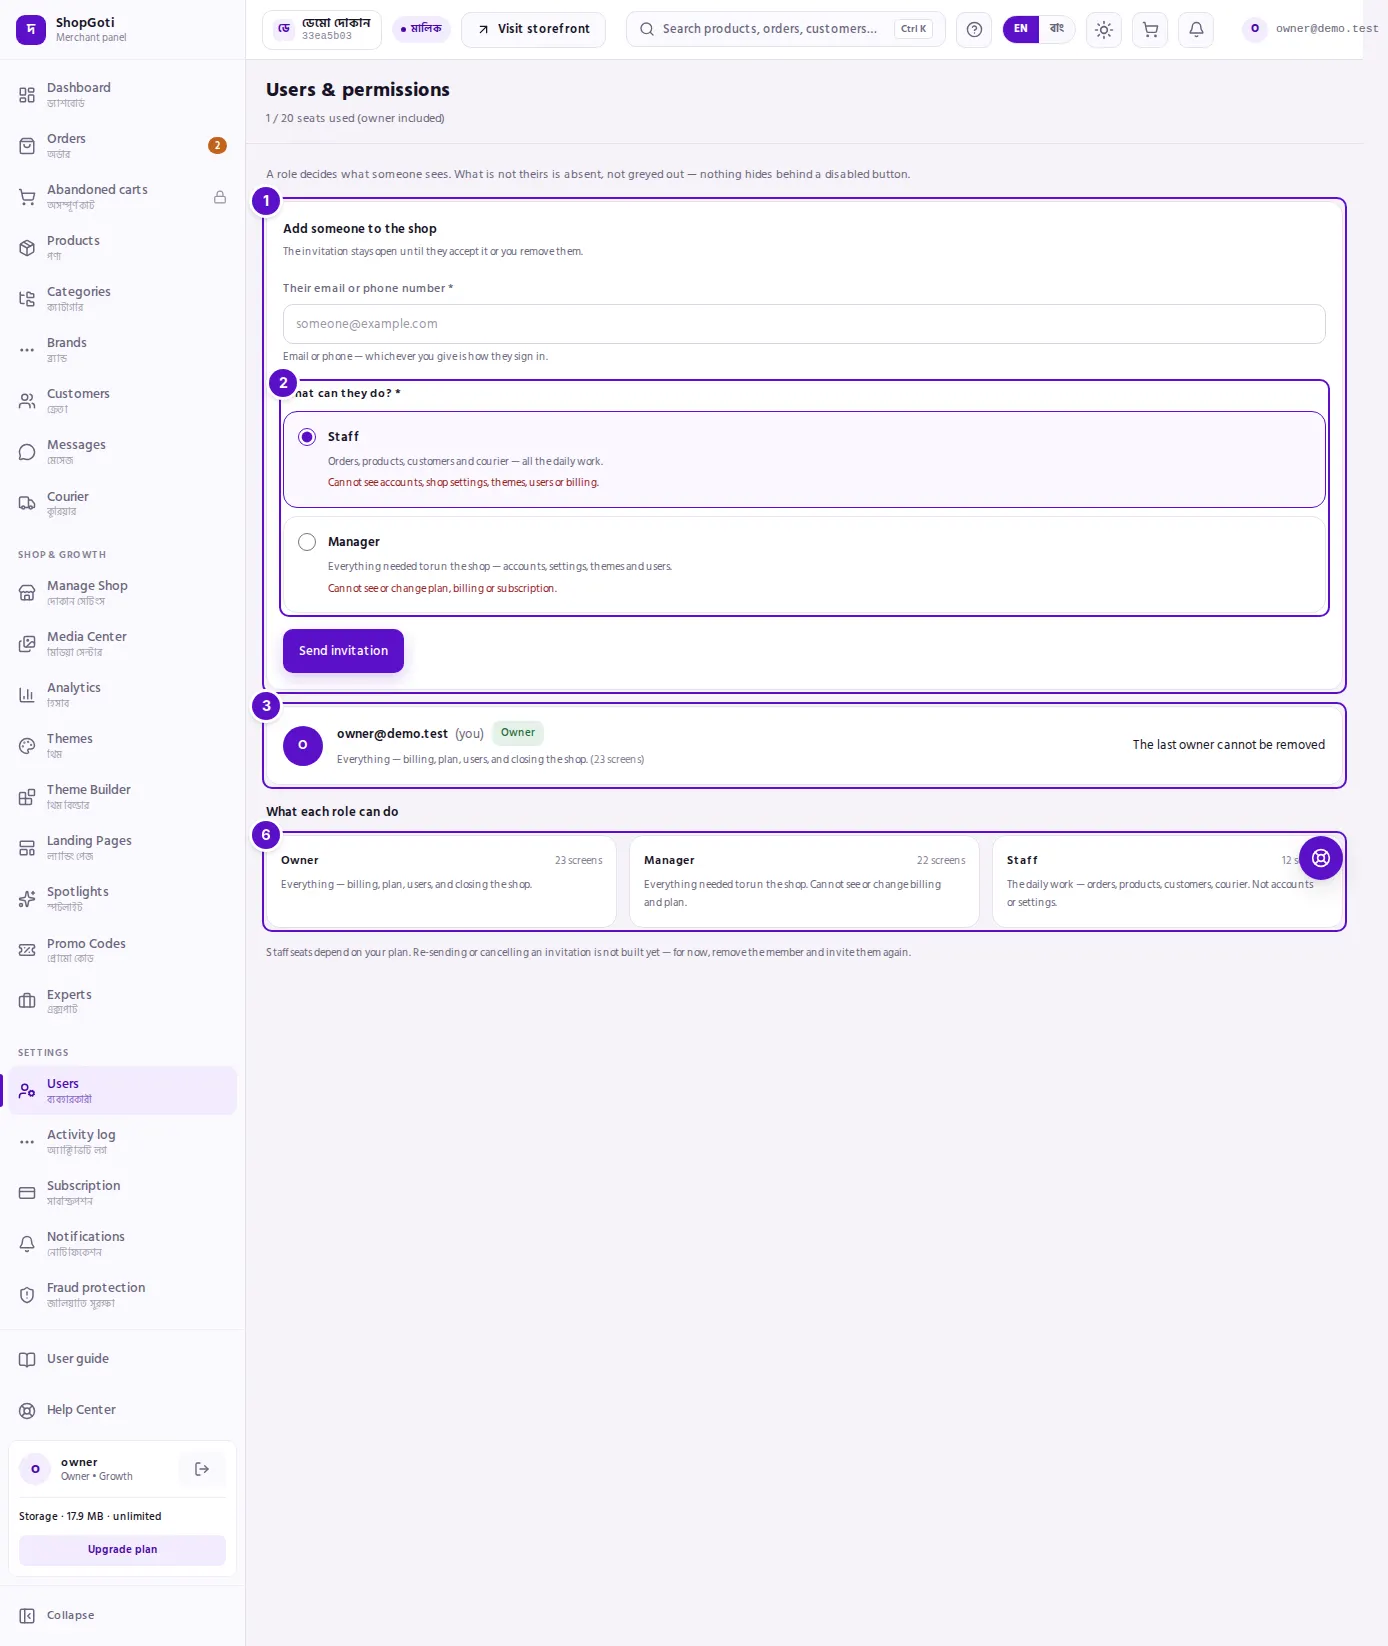
- Invite form — Add someone to the shop. The contact field, the role choice and the Send invitation button.
- What can they do? — two choices, Staff and Manager. Under each one, a line says what that person can see and a line says what they cannot.
- Member list — one card per person. It shows their email or phone, a Role badge, a status badge if they are not active yet, and a line that describes the role.
- Role menu — Owner only. It lists Owner, Manager and Staff. The change saves as soon as you pick a value.
- Remove — Owner only. It sits at the right of the member's row.
- What each role can do — three cards, one per role. Each card shows how many screens that role can open, counted from the rail.
The line at the top of the page reads N / M seats used (owner included) when your plan sets a seat limit. Otherwise it reads N people can open this shop.
Steps
Invite someone by email or phone
Steps
- Open Users from the rail, under Settings.
- In Add someone to the shop, type the person's email address or phone number into Their email or phone number.
- Under What can they do?, press Staff or Manager. Read the two lines under the choice you make.
- Press Send invitation. A confirmation appears, and the person is added to the list with the status Invited.
The invitation stays open until the person accepts it or you remove them.
The person may already work in other shops — one account can be a Manager or Staff member of as many shops as invite it, and each shop keeps its own role for them and counts them against its own seats. What an account cannot do is own more than one shop, so you cannot make someone an Owner if they already own another shop.
What the invited person does
The person you invite gets an email with an Accept invitation button. They do not need an account first.
Steps
- They open the email and press Accept invitation. The page Join the team opens.
- They press Send me a code. A six-digit code goes to the same email address the invitation was sent to.
- On the next screen, Set your password to join, they type the code, choose a password and type it again.
- They press Set password & join. They are signed in and land on the shop's dashboard.
If the person already has a ShopGoti account, they can press Sign in on that page instead. After signing in they come back to the same page, which shows a single Accept invitation button — no code and no new password. The same button shows if they were already signed in. If the invitation was removed in the meantime, the page says This invitation is no longer valid.
Change a member's role (Owner only)
Steps
- Find the member in the list. Your own row has no role menu.
- Press the role menu beside the member's name and choose Owner, Manager or Staff.
- The change saves as soon as you choose. There is no Save button.
- Check the role badge and the line under the name. They now show the new role.
Remove a member (Owner only)
Steps
- Find the member's row.
- Press Remove at the right of the row.
- The member is removed straight away. There is no "are you sure?" step.
Invite a member again after a mistake
Re-sending or cancelling an invitation is not available yet. To fix a wrong invitation, remove the member and invite them again.
Steps
- Press Remove on the member's row.
- In Add someone to the shop, type the correct email address or phone number, choose the role, and press Send invitation.
Fields
The invite form has two fields.
| Field | Required | What it does | Example |
|---|---|---|---|
| Their email or phone number | Yes | The address the person will sign in with. If they have no ShopGoti account yet, one is set up for this contact. | [email protected] or 017XXXXXXXX |
| What can they do? | Yes | Staff or Manager. Owner is not an invite choice. | Staff |
Tips and common mistakes
Related pages
- Activity log — the record of role changes, invitations and removals.
- Plans — the seat limit that each plan includes.
- Dashboard — the summary page you land on after signing in.